Showing posts with label Nestabilities. Show all posts
Friday, January 21, 2011
Home Sweet Home with Label 16 and Lacey Circles
I must open with an apology - I intended to write this post and publish it at 6:00 am this morning, but .... Last night I fell asleep reading and did not finish everything I had planned to do. My husband has this bad habit of falling asleep on the sofa. The way this plays out is about three nights a week he falls asleep on the sofa and I wake him to send him to bed. He ignores me the first time or two that I wake him. Occasionally he begins snoring while on the sofa, which is quite irritating. Usually I just wake him and eventually he will go to bed.
Last night I was reading on the love seat and he fell asleep and began the snoring routine. I suggested he go to bed and he promptly ignored me. As his volume increased I decided to find a new reading location and I took my kindle to bed. At some point I feel asleep and left him on the sofa. He woke me at 3:00 am as he turned off the lights and came to bed. So... he was on the sofa far longer than usual and I got nothing done on my blog!! I am not sure exactly which of us learned a lesson there....
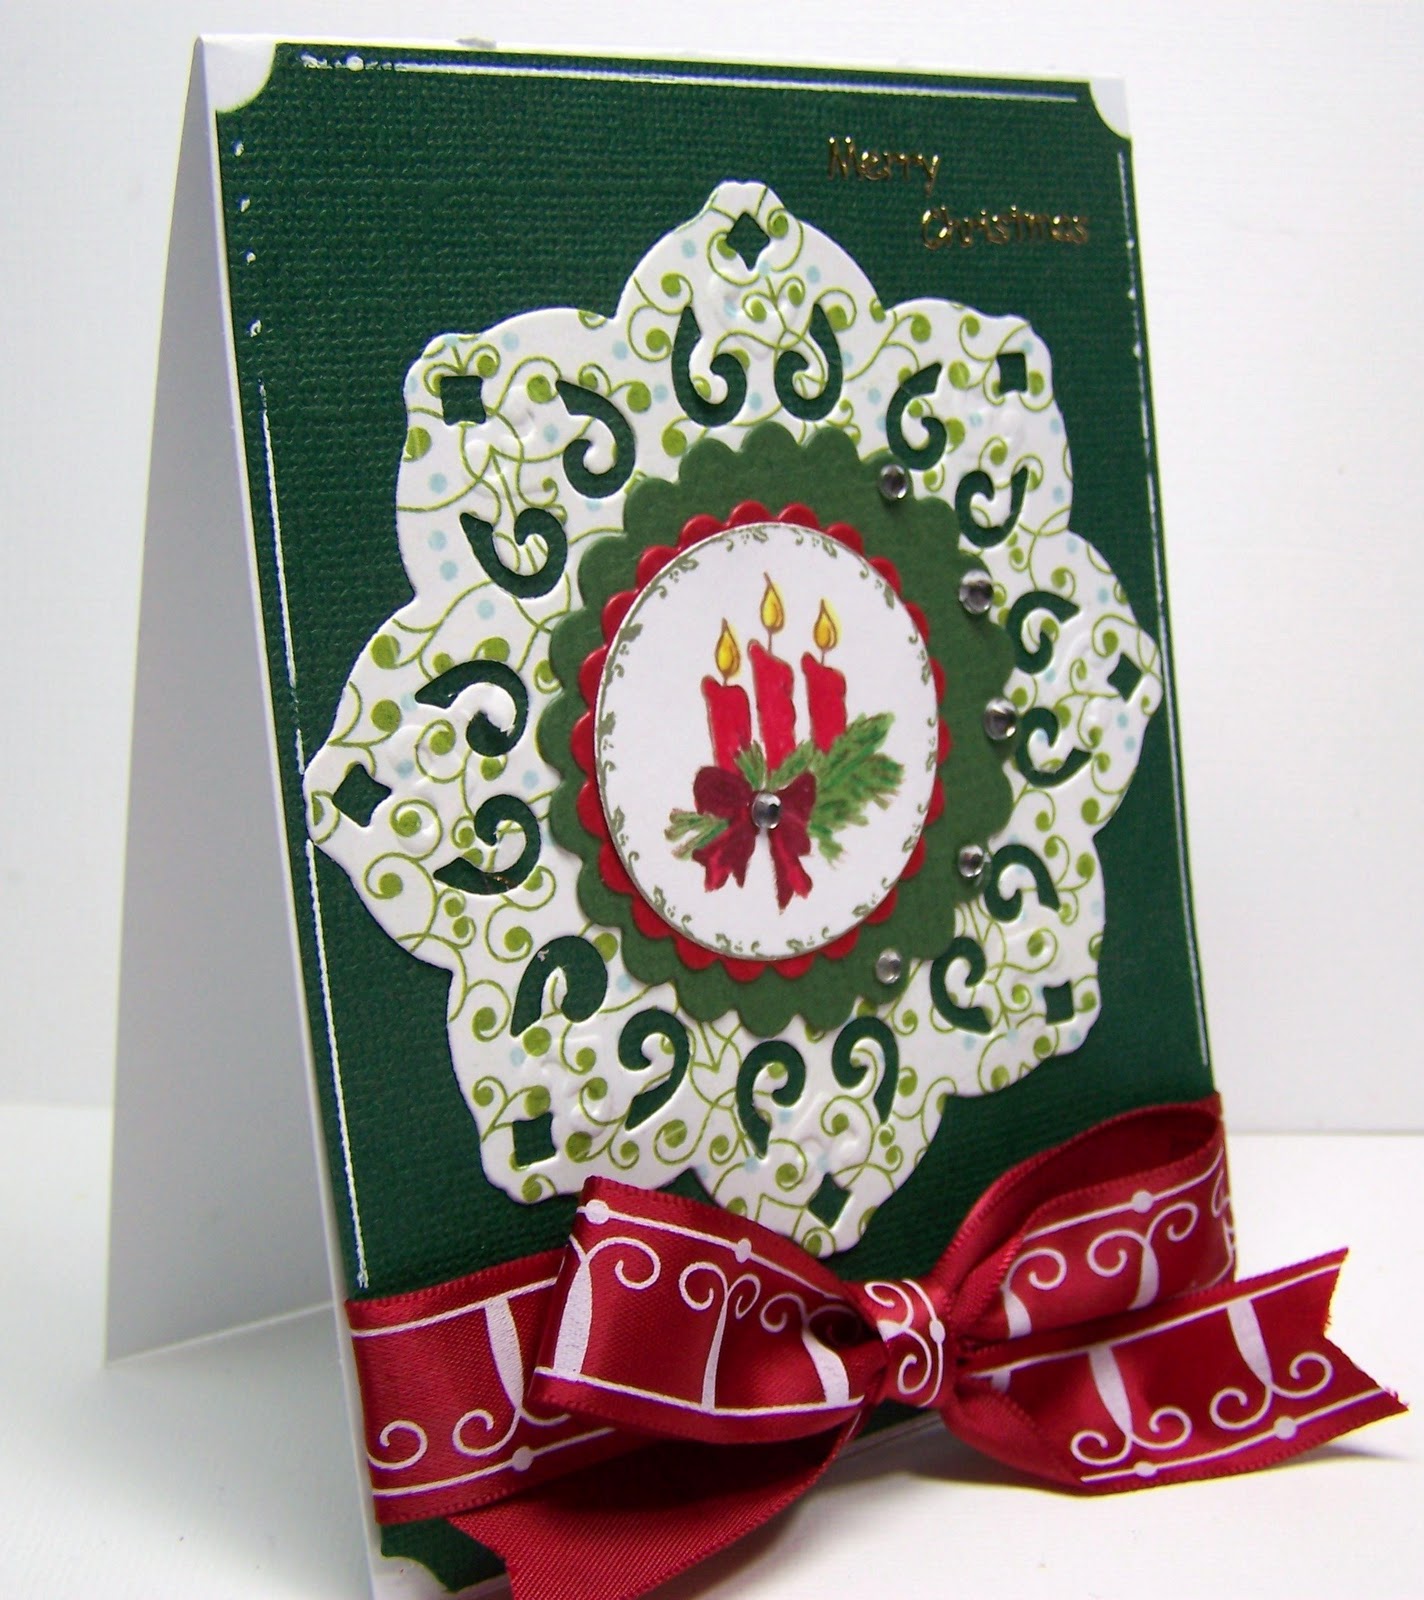
So on to the card. This is one of the fun Spellbinders cut cards that I created last weekend at the lake. I used left over paper (that I love) by Three Bugs in a Rug.
I began by creating this fun focal point of the card - I used Spellbinders Nestabilities Label 16, a GinaK stamp from the lovely labels 2 set, and circle nesties. I stamped the music frame on smooth white cardstock and cut it out with label 16, using a circle nestie to cut out the center. I then cut a larger version of label 16 in black cardstock and cut the center out with a smaller circle nestie. I adhered the two layers together and placed the pink house image in the circular opening. I adhered the house label to the card using pop dots.
Next, using Lacey Circle nesties and round nesties I created the tag. I layered three round circles on top of the lacey circle - stamping the top layer with black ink.
I found pink ribbon in my stash that perfectly coordinated with the background paper and added a the ribbon runner with bow as a finishing touch.
Now all I need is a house warming party to attend or a new neighbor down the street!!
Monday, January 10, 2011
Winter Wedding Card for Holly
Today I am sharing the card I made for a wedding I had planned to attend last Saturday. The youngest child of my cousins Danny & Martha, Holly, married her beau, Andrew. I have always loved Holly's name and it was fitting that the few photos I have seen from her wedding included springs of Holly.
Because Holly's wedding was set in the midst of winter I chose to use Spellbinders Snowflake Pendant and Label 16 to create a frosty winter wedding card. Besides, I can use the practice playing with my Spellbinders. I just hate that this nasty tummy thing made me miss Holly's wedding.
I used Spellbinders snowflake impressibility and embossed the front of a white card. I then used the largest of my label 16 dies and cut out the shape from the front of the card. I then used the second larges label 16 die and cut a piece of silver cardstock, followed by using the next smallest die to cut out a red metallic piece of cardstock. I adhered the layers together and added the center red snowflake and a silver snowflake charm to the card. I backed the inside left side of the card with a piece of plain white cardstock in an effort to cover the layers.
I stamped the word Congratulations using a generic wedding stamp set and hand trimmed the phase to fit the spellbinder tag cut.
I used a combination of smooth red and silver metallic papers to cut out the snowflake pieces. I layered the snowflakes together and attached them to the front of the card.
I finished the card with small snowflake stamps added to the inside of the card and as an accent on the envelop.
I had several comments on my scraproom disaster area after yesterday's post. I want to assure you all that I spent quite a while late yesterday afternoon cleaning and organizing my room. It is almost back to normal. Now if I could just get the rest of the house in shape. I had a bad and lingering stomach virus last week so Christmas lingers in every room of my house. That too is part of my Tuesday plan.
We have had quite a bit of winter this year in South Carolina. Sunday night/Monday brought the latest round of winter to our area. We received snow followed by ice. It was quite pretty, but quite debilitating to the community. Our area of the state comes to a complete grinding halt when we get bad weather. But since I know not to venture out (the natives do not know how to drive in this) tomorrow looks like a good day to continue working in my scraproom.
Wednesday, January 5, 2011
Warm Winter Birthday Wishes
Happy Wednesday everyone. We are halfway through the first week of 2011. I bet all of you teachers out there are counting the hours until Friday afternoon after two weeks off. My son's school district scheduled a teacher work day on Monday to help them transition back to school. He was thankful for the transition day.
We have two family birthdays in January, my mom and my daughter. Their birthdays are one week apart - Bethany was late and my mom was annoyed that Bethany refused to be born on her birthday. I wanted her to come by Christmas so I had not sympathy for mom's annoyance!!
Anyway, this is mom's birthday card. Inside the card, which I forgot to photograph, reads Warm Winter Birthday Wishes! I used Bazzill cardstock and Echo Park cardstock; Spellbinder's Snowflake Pendant 2010, Label #14, Lacey Circles, and regular circles dies; JustRite stamps and Popcorn the Bear stamps; Stampin' Up ink and ribbon to create this card. Oh, and a Spellbinder's embossing plate.
I wanted a winter themed card that was both feminine and fun and I believe that this card met those goals. I used Bazzill shimmer cardstock and Spellbinder's Snowflake Pendant dies to cut the adorable pink snowflakes. I used a pink ink to stamp the circle and lacey spellbinder dies with JustRite stamps. Again, going for feminine with all of the pink, yet fun with the embossing and less formal stamps.
I had trouble finding a Happy Birthday stamp for the front of the card. I am not sure where I stashed all of my birthday stamps. I finally used a Popcorn the Bear "Happy Birthday" stamp.
I should be back tomorrow with another Spellbinder based project.
Labels:
Birthday Card,
JustRite Stamps,
Nestabilities,
Spellbinders
Tuesday, January 4, 2011
Valentine Treat Box with Spellbinders
Yesterday I headed off to my scrap room with every intention of making my mom a birthday card. However, I spotted my book of nesties sitting out from a previous project and decided to play instead. I had a template that I picked up last February (!) at the annual Columbia stamp show, that I had never used. I decided to use the template with my heart shaped nesties to create a Valentine box.
I took a sheet of 18 x18 inch cardstock, trimmed it down to 18 x 12 inches and laid the template over top. Using small clips to secure the layers I then cut out the template and the box. With the template still clipped to the cardstock, I used my Scor-Pal to score all of the fold lines on the template (see below).
Next I used my heart shaped Nestabilites and my grand Caliber and cut out the front heart shape on the box. I used white sparkle cardstock and cut out the frame for the front heart.
I found the pink box just a bit to plain so I covered it with Valentine paper, again cutting the heart out of the front. The box was finished by adding ribbon at the top edge, removing the handles as I did not like them, and affixing the white scalloped heart frame around the acetate window.
I created an embellishment using the leftover white heart cut out with two smaller hearts and a Prima flower rose. The pink heart was stamped with a "Hugs and Kisses" stamp and trimmed in glass bead trim.
Wednesday, December 22, 2010
Merry and Bright Cards
What happens you combine Echo Park cardstock with a Stampin' Up stamp and Spellbinder's Nestabilities? You get fun Christmas cards that are as cute as they are easy! Including stamping, heat embossing, cutting out the elements and assembling, I made these two card in about thirty minutes!
I began by stamping the Merry and Bright Stampin' Up phrase in embossing ink on smooth white cardstock. I topped the embossing ink with bright red embossing powder and heat embossed. Using round nesties, I cut out the Merry and Bright phrase. I used red chalk to highlight the edge of the white circles and then I used Nestie's Lacey Circles and cut out the lacey matting.
I affixed the Merry and Bright circles to a fun snowflake print by Echo Park atop a glittery blue mat. Stampin' Up ribbon was added, as well as fun glittery corners and then the entire card front was mounted onto a red card.
The inside of the card was stamped with a Stampin' Up Christmas greeting and two little red snowflakes. The cards have matching red envelops that were stamped with white snowflakes.
And now I have to go wrap the two items that UPS delivered after dinner.... And I had foolishly thought I was finished wrapping!! I checked my list and discovered that I have three more items due in this week and UPS confirms that they are on their way! So five more packages to wrap and THEN I will be done!!
Labels:
Christmas Cards,
Nestabilities,
Spellbinders,
Stampin' Up
Tuesday, December 14, 2010
A quick card with lacey nesties and tiny stamps
I spent a big part of the weekend addressing Christmas cards and made the horrifying discovery that I am eleven cards short! I do have others I could use - just none that I really like. So, I will be making some last minute cards for a couple of neighbors and for my husband's staff. Doug likes to give each staff member gift separate from anything the company does for them and he likes to include one of my cards.
The card was whipped together from leftovers, but came out cute. I cut a white base card and topped it with a leftover piece of red cardstock, ticket punching the corners. Atop that I place a scrap of fun snowflake paper with rounded corners. I attached the HO HO HO festive ribbon, but needed to find something for the center.
That is when I remembered the little dollar stamps I had picked up at Michaels. I stamped the ornaments in Stampin' Up Red Riding Hood Red ink and added touches of color with Copic markers. I then added touches of Stickles. I cut out the ornaments with my circle nesties, at which time I also cut a mat using the lacey nesties. I affixed the layers together and placed them on the card front. But something still seemed to be missing.
And that was when I recalled one of the treasures I purchased when MFK (My friend Kathy) and I recently went to Michaels. I found a large package of red glittery holiday phrases - long enough to be a page border or they can be clipped apart and used individually. I snipped off a single "Happy Holidays" phrase and affixed it to the front of the card. Did I mention that the words are self-adhesive? Nice find, huh?
Here is one last look at my neighbor's card. I will be giving the tin's with my home baked goodies and a card to each neighbor. I will be back tomorrow with another of the eleven new cards - after I make it of course!!
Monday, December 13, 2010
Feastive Wreath Card with Joys of the Season & Heirloom Ornaments Nesties
Oops! I *just* checked my blog and discovered that it never posted this morning. So sorry.
I was wrapped up in Christmas cards and had not anticipated that blogger would mess with my post!
It's a festive Christmas BBTB2 Monday and I have a new project to share. The challenge cut of the week at the Bitten by the Bug 2 blog is the wreath from the Joys of the Season cartridge. My confession is I had never cut this wreath before. But after this weekend it just may be one of my favorite cuts from JOTS. Isn't it funny how we can be introduced to new cuts even when we are part of a design team? That is one of the best parts of a design team; well that and the wonderful design team sisters!
Do I even need to tell you that I used Cricut Design Studio to design my card? The Gypsy would have worked just as well, but I am addicted to using my laptop. I placed two of the wreath shadow cuts onto the mat, flipping the second wreath so that it was a mirror image of the first. I used the Hide Select Contour feature and removed the open centers from both shadow cuts. I nudged the two shadows together and welded each so that they would cut as my base card.
I cut the top layer of wreath in a light green Core'dination cardstock, and the accent leaves in a medium Core'dination cardstock. I added highlights with Copic markers.
For the center of my card I used the two smallest sizes of Heirloom Ornament Nestabilities. I used a decorative stamp on a piece of smooth white cardstock and stamped in red and cut out one of each size ornament from the image. I then cut out the center part only of the second from smallest ornament and stamped it with an ornament stamp and a Merry Christmas sentiment. I added the three ornaments to the card using pop dots. Pen accents were added on the ornaments and on the card to represent the ornament hangers.
From the side you can see that I used deeper pop dots for the ornaments and smaller dots forth accent leaves. For the berries, I used a 1/4 inch hole punch and glued the dots to the wreath. As a final touch I added the fun red and white striped ribbon to the card.
Inside the card I cut a four inch circle and stamped a Christmas greeting in black Staz-On ink. Below is a final look at the card. While I love the heirloom ornaments, this card would be cute with a Cricut cut sentiment in the middle of the wreath. One last comment, this card goes together quickly so if you still need to create a few cards, this card would be perfect for last minute Christmas Cards.
Wednesday, December 8, 2010
Playing with New Nestabilities - Heirloom Ornaments
Tuesday was a cold day here in SC. Cold as in TRULY cold for us. It was in the 30s. Now before all of you readers located in Wisconsin and Michigan and other such chilly states fall over laughing, let me assure you that our windy 30s in the Carolinas IS cold! I even put on a jacket to walk to my mailbox and I don't really like wearing a jackets! The good news is I spent a big part of the afternoon in my scrap room playing with new toys. Not new in the sense that I just got them, but new in the sense that I just opened them.
I ordered and received Spellbinder's Heirloom Ornaments nesties in Oct/Nov and had not made time to get to know them. Today I opened the nesties and pulled out my Grand Caliber and had fun getting to know the set. I didn't create anything amazingly wonderful, but I did learn to cut two ornaments at once to create a frame shape.
In the end I cut three frames in green metallic cardstock, three large red cardstock ornaments, and three little Christmas trees from a Spellbinder's Christmas set. I assembled the three layers, then scored down the middle of each of the three ornaments. I applied glue to the back of each of the three ornaments and attached them all together. This would probably have looked better had I cut four of everything - that will teach me not to use scraps the next time I am playing!
I used a 1/8 inch hole punch and attached green cording to the ornament in order to hang it on our tree.
I will be back tomorrow with a super quick Christmas card to share.
Monday, December 6, 2010
Ho Ho Home Baked Goody Container
Good Bitten by the Bug 2 Monday! BBTB2's challenge cut of the week was selected by my design team sister Joanna and is the Santa from the Winter Frolic cartridge. As I am currently planning my baked good gifts for my neighbors, I am also planning packaging for the baked goods. I am planning to use large crafting paint cans as their size will allow for greater volume.
The Santa was cut using design studio at 2.5 inches so he would fit nicely on this lacy nestability. I cut the base Santa in black and the remaining cuts in either red or white cardstock. I assembled the Santa with glue, using a Copic skin tone marker on Santa's face and cheeks. I added a gemstone as Santa's cherry nose. The toy bag and belt buckle were cut in black glittery cardstock.
I cut all five of the lacy edged nesties in pink cardstock. Santa was attached to the second to the largest nestie.
The paint can was covered in a blue on blue pattern cardstock purchased from Darcie's. Using white cardstock scraps and a Spellbinder's large border, I cut the bottom edge border using my Spellbinder's Grand Caliber machine. The border was then glued to the can.
I found a 1.5 inch diameter snowflake stamp in my stash and decided to add stamped snowflakes to the printed paper. Snowflakes were also added to some of the pink nestie cuts.
Using a piercing tool and hammer, I pierced the can and attached the large jeweled snowflake brads. The pink nesties were also added around the can.
The top of the can was trimmed in blue, white and silver ribbon, then trimmed out in silver peel offs. Silver peel offs were also attached to the bottom edge of the can.
Additional ribbons were tied to the handle and for the photograph only I added holographic shred to the can. In real life the can will be lined with Christmas print food wrap and will contain home baked goodies for my neighbors!
Friday, November 26, 2010
Nesties and JustRite Stamps team up for Elegance
Is everyone still "stuffed" from Thanksgiving?? We are looking forward to "round 2" today with the leftovers!
Before we get into the details of today's card, I want to announce the winner of my DVD set, It's a Kid's Life, from the Kickin' Off Christmas blog hop. The winner is
Melissa (who) said...
This card is absolutely gorgeous!
And now on to my Christmas card.... This card was created using white cardstock as a base card and green textured cardstock as a front matting. I stamped the candle image and surrounding circle onto smooth white cardstock. After coloring the candles, bow and greenery with Copic markers, I used my circle nesties to cut out the candle image. I then used to scalloped nesties to cut a small red matting and a larger green matting. The three layers were glued together and set aside.
I used the base layer of my nestie charm to create the pretty printed background matting. I attached the three layers with the candle image to the center of the charm and affixed the charm to the front of the card.
I used Peel Off Christmas phrases to add greetings to the cards, as well as two different ribbons to create a different feel for each of the cards. Where the print ribbon creates a sassy, fun card, the solid ribbon creates an elegant card. In both cases I finished the cards with white gel pen doodles.
Depending on my post-Thanksgiving recovery and decorating schedule I may or may not return tomorrow with a new project. I will keep both of us guessing!
Labels:
Christmas Card,
JustRite Stamps,
Nestabilities,
Spellbinders
Thursday, November 18, 2010
Thankful for the Little Things
Surprise! Another Thanksgiving themed card - but this card is completely different. Well yes, it does utilize the same Autumn Blessing stamp set, but also introduces some additional color to the fall palette!
The center image and border were stamped in a burnt brown on pumpkin colored cardstock. The center image was colored with Copic markers and then cut with the oval nestie. I decided to shake things up a bit with a green scalloped matting! The nesties were affixed to an embossed white cardstock and mounted on fun fall print cardstocks. I went with a pumpkin colored base card.
I think this is my favorite Thanksgiving card of the week. I really like the green twill ribbon and the fun print cardstocks. I also really like the sentiment because sometimes in the day to day routine of life we do forgot to remember to be thankful for the little things! This card is a nice reminder!
Labels:
Card,
JustRite Stamps,
Nestabilities,
Spellbinders,
Thanksgiving
Tuesday, November 16, 2010
Thankful for Fall
Here is another JustRite stamp Thanksgiving card. I think this one is for my mom! My mom lives about 5 hours away from where I live and she will be spending Thanksgiving with my brother and his family. I will be staying home as my sons will be coming home from college and work in other cities. My mom likes the fall color palette so this card should appeal to her.
This is another center and border stamp from the Autumn Blessings stamp set that I used yesterday. All of the borders are interchangeable so it is easy to mix and match the centers and borders. The JustRite stamps were designed to compliment Spellbinders Nestabilities. So far I only own circular and oval stamps, but they also come in rectangular shapes.
The stamped image and the scalloped matting were cut with oval nesties. The print matting under the ovals was also cut with nesties - label number five. The print label is affixed to two layers of matting which have been punched with the corner ticket punch. Two layers of ribbon surround the mats and are tied with a two tone bow. A strip of golden rod colored lace was added under the ribbon. And under all of this is one more layer of print matting and a rust colored base card. There are five amber gemstones accent the stamped image, bow and card corners.
I like how pretty and feminine this card seems, while still maintaining a fall feeling. I will be back tomorrow with another Thanksgiving themed project.
Labels:
Card,
JustRite Stamps,
Nestabilities,
Spellbinders,
Thanksgiving
Subscribe to:
Posts (Atom)