Showing posts with label BBTB2. Show all posts

Monday, June 20, 2011

Sunny Days with Celebrate with Flourish and BBTB2


Happy Monday and happy (HOT) summer!  This is my week to host the challenge cut at Bitten by the Bug 2.  In honor of the Summer Solstice, I selected a fun, summery cut - the phrase "Sunny Days" from the Celebrate with Floursh Lite cartridge! 


I designed this layout a month ago when I first selected my challenge cut.  The timing was perfect as my husband and I had just booked out first cruise!  Our 30th anniversary is in November so we decided to take a 6 night cruise to the Bahamas and Key West to celebrate.  We thought this cruise sounded like a perfect opportunity to introduce us to cruising - to get our feet wet, so to speak!


So, with "cruising on the brain" I combined cuts from Celebrate with Flourish and Life's a Beach cartridges to create this fun layout.  I used Celebrate with Flourish (CWF) to cut the Sunny Days phrase and the sun with clouds layered cut.  I love the layered look of the word phrases on CWF.  I confess that I have been utilizing a similar layering technique long before CWF was released. But using CWF makes the layering of letters MUCH easier.   I also really like the swirl cutouts - or flourishes - that are part of every CWF cut.  Such a fun cartridge.


I uses Life's a Beach (LIB) to cut the elements on the lower half of the page.  I cut the ship in multiple layers and had cut an additional bottom piece to make the ship taller.  I trimmed the ship out with ribbon, dashes and a cute little anchor. 


The double layer waves and the dolphines were also cut from LIB.  I had never cut the dolphines so I was a bit nervous about the tiny outline pieces.  But as you can see it all went very well.   The waves were cut in two layers - after welding two of each of the wave cuts together.  I thought the dolphins looked cut jumping out of the water between the waves.


I used this great beach photo on the layout, though truthfully I will probably make a matching page and save the layout for our fall cruice.  The photo mats will hold up to a 5 x7.  Sadly I was out of 5 x7 photo paper and had to print this photo at 4 x 6. 


If you have not already done so, please go by Bitten by the Bug 2 and check out the design team projects. I had a sneak peek and was WOWed by some of the great projects.  Also, please consider playing along with us on the weekly challenge.  Complete a new project this week using the "Sunny Days" phrase cut and post your project in the link area at BBTB2.  We provide a blog blinkie to the best project of the week, selected from those who chose to join us in the challenge.

Monday, June 13, 2011

Gnome Birthday Fun with BBTB2


Happy Monday!  Welcome to another Bitten by the Bug 2 weekly challenge!  This week's challenge cut was selected by my design team sister, the lovely Theresa Kelly, and  is any Gnome from the Freshly Picked cartridge.  I decided to have a bit of birthday fun with the Gnomes - creating this Gnome Pyramid birthday card.  The design for this card was inspired (and by inspired I mean ripped-off) from my friend Donna Mundinger's FABULOUS Penguin Card, which can be found here at her blog and  here at Custom Crops with design studio cut file and complete instructions.  Donna is one of THE MOST AMAZING paper crafters E-V-E-R... and I am thrilled to be able to say I know her! 


This card features six Gnomes each dressed in his favorite summer party outfit!  And just as we women match our shoes and purses (in an ideal world!), the Gnomes have matching hats, belts and shoes.  The well dressed Gnome likes for his outfit to coordinate!  The Gnome faces were stamped in light brown ink with Peachy Keen stamps.  A cherry Copic marker was used to highlight their lips. Their beards were cut in white cardstock, then heat embossed with white with touches of grey embossing powder.  Their ensembles were finished with tiny pom-poms at the top of their hats.


I used three cartridges to cut this card, Freshly Picked, George and Basic Shapes, and Christmas Cheer.  The banner above was cut from Christmas Cheer, then stamped with a rubber stamp from Michaels. 
The photo below is a screen shot of the card top in Cricut Design Studio.  I welded the six Gnome shadows together in a pyramid shape, adding birthday gifts from Christmas cheer.  I cut this layer in red, affixed it to the base card, and built the card front on top of this layer.


Below is the inside of the card.  You can see the red base cut (above) is the upside down red layer in the photo below.  I attached the red layer to the open cut triangle top.


The base card was created using George and Basic Shapes.  I sized and welded to triangles together, then inserted a NON-welded triangle into the middle of the top layer.  This created the cut out so that the blue swirl print shows through the holes in the front of the card.


I used metallic cardstocks to cut the packages and the belt buckles.  I finished the card by using pop dots to attach Happy Birthday banner!
 

Thanks for stopping by today.  Be sure to head over to Bitten by the Bug 2 and check out all of the designer's awesome projects!  And, if you have time, please consider playing along with us this week!!

Monday, May 30, 2011

Birthday Cake Card for BBTB2


Happy Monday and happy Memorial Day to those in the USA.  You may have arrived here from fabulous Theresa's blog if you are following the monthly Bitten by the Bug 2 blog hop.  If you are just dropping by, continue on the blog hop when you leave my blog - after you enter the BLOG CANDY giveaway.  This week's challenge cut at Bitten by the Bug 2 is  the birthday cake from the Celebrations cartridge.  I love this birthday cake - it is one of my favorite cake cuts.  And even though there are newer birthday cartridges, I still love this "go to" original Cricut birthday cartridge!

I designed my card in Cricut Design Studio, welding two of the cake shadow cuts to create the base card and cut the card in aqua Bazzill cardstock.  I used the Hide Select Contour feature and removed the cut space inside the tray legs on the the shadow, creating a solid, one piece shadow cut.  Using Imaginisce B-day Bash line I cut a base layer in chocolate birthday candle cardstock.  I build the rest of the cake on the chocoate birthday candle layer.


The top layers of the cake was created in three layers: back layer in lime green Core'dination cardstock, main cake layer in Imaginisce B-day Bash cardstock, and gold tray layer cut in metallic cardstock.  After affixing the three laters together I tied a length of red Imaginisce ribbon around the cake and added the Happy Birthday phase (cut from the Batman cartridge) to the front of the cake.  I then used pop dots and attached the cake to the base card.


I cut the background cake layer in smooth white cardstock and affixed it inside the card and added another Happy Birthday cut.  This is the perfect surface the shape on which to write a personal birthday message.
To finish the front of the card I added two of the three candles from the cake cut.  I also added an Imaginisce cardstock embellishment birthday cake to the top of the cricut cake - turning my cake into a four tiered cake!!  The cake was then blinged out with various sizes of gems.


Did I mention BLOG CANDY and blog hop???  Thanks to the AMAZING CUSTOM CROPS I have wonderful blog candy to offer you!  How about a $20 gift voucher for shopping at Custom Crops???  I would love that so I bet you would too!  All you have to do to be entered into the random drawing for the blog candy is
1. Be a follower of this blog, and
2. Leave a comment under this post.  
I will be posting the winner on Thursday.

When you finish the blog hop you may want to hop by Custom Crops and check out all of their new in stock items.  You may also be interested in their DVD, Cricut for Beginners, a wonderful DVD which teaches you to use all of the features on your Cricut.

Now that you have enjoyed (??) my blog post, you have become a blog follower, left your comment below and taken note of the Custom Crops it is time to continue on to the next stop on the blog hop.  You are off to see the lovely Penny of PenniAnnie's. Enjoy the rest of the blog hop and if you have not already done so, please drop by Bitten by the Bug 2 look at all of the design team projects.

Monday, May 23, 2011

Soaring with Florals Embellished & BBTB2


Happy Monday!  I hope this Monday morning finds all of our Midwestern Cricut friends safe and sound.... The weather channel and news channels covered some horrid storms and tornadoes though the middle of the US last night.  That is especially horrid in those areas already suffering though flooding.  I hope that everyone is well.

My friend and design team sister, the incomparable Donna Mundinger, selected the challenge cut this week at Bitten by the Bug 2.  Donna selected this lovely bird from the new-ish Florals Embellished cartridge.  I must say, Hello Kitty and the Disney cartridges have nothing on this bird!  There were A LOT of cuts to assemble for this bird!

First, I have a story to share with you about the Florals Embellished cartridge.  Back in March when I attended the Cricut Circle Crop in Atlanta I actually won this cartridge.  Madge, the fabulous crafter sitting to my right, won a screen for the Yudu Card Shop, but did not have a card shop machine.  Later in the crop I won a Yudu Card Shop.  Madge was a honey and gave me her screen.  I, of course, immediately gave her my Florals Embellished cartridge so that we both had prizes.  I did not tell Madge, until now(!) , that I really coveted that cartridge. 

A few weeks ago when I found out that Donna had selected to use the Florals Embellished cartridge, I immediately searched my usual cartridge sources for the best price on FE.  I found a good price and purchased the cartridge - and I am quite pleased that I did so.  I think this cartridge is going to be fun.


I used four cartridge to create this card: Just Because Cards (base card), Florals Embellished (bird and medallion), Plantin Schoolbook (a welded rectangle), and Martha Stewart Elegant Art (the border on the lower front of the card).  Using design studio I welded a rectangle to one end of my base card and a MS border to the other end.  I made sure that the rectangle and border were the same height/width, that way the center score line on the card remained the same.  I cut the base card in white cardstock, and then I cut the card front only in Basic Grey cardstock. 

I think I am going to love my MS Elegant Cake Art cartridge.  The cartridge has a lot of MS border cuts and different shaped edged mats.  Using your Gypsy, Cricut Craft Room, or DS you can resize and weld the border cuts to your cards or layouts.  Think of all of the MS border possibilities that this cartridge provides.  I feel like even though I may have paid $40 for the cartridge, I saved a mint in MS punch costs!


I layered the bird onto the medallion with pop dot, and I also layered the medallion onto the card with pop dots.  I used Stampin' Up ribbon without a bow.  I like the texture and the color of the ribbon, but a bow would have distracted from the bird.


I finished the card by adding doodle dots to the bird and medallion.  I also added the "post card" scrap and the thin strip of cardstock to the lower front of the card.


My goal for this week is to learn to use my new E2 Cricut machine with both regular and Imagine cartridges.  I will keep you posted on my progress!

Please do take a few minutes and pop over to BBTB2 and check out the teams' projects.   And remember, we would love it if you should decide to play along with us!!

Monday, May 16, 2011

FAB Sunglasses and Purse with Forever Young


Happy Monday! I am so excited to share today's Bitten by the Bug 2 project with you! Our team leader, Heather, selected this week's challenge cut - the sunglasses from Forever Young. I LOVE the sunglasses and other fun cuts on Forever Young!! I also love all of the 3D purse options on FY! So sunglasses and purses were the perfect companions for today's project.


I began with a large purse, 9 inches tall (about 16 inches wide). I cut the purse in double sided cardstock, polka dot side facing out. Using George and Basic Shapes, I welded a circle and oval to create the front panel of the purse and I cut the panel twice in this fun pink, green and aqua print.

I used lime green cat's eye chalk to "ink" the edges of the front panels as well as the tiny gingham trim pieces (also "build" in George to fit the base purse).


I cut the sunglasses in three layers, the icon cut in hot pink, the shadow cut in a green polka dot, and the dark lime glass lens.  I used A LOT of pink punch Stickles on the glasses frames - I wanted for the frames to appear to be made of sparkling pink plastic!  I finished the glasses with dark brown dots on the lens and a touch of red stickles in the flower cutouts on the corners.


I created hybrid flowers for the purse, again using cuts available on Forever Young.  Cut the flower as it appeared on the cartridge EXCEPT, I cut four of the largest layer of petals.  I then folded the four flowers into quarters and created flowers very similar to the 3D Mother's Day flowers from Cricut.  The only difference is that this flower already had leaves attached.   I used the same green cardstock for the shadow cut as I used for the glass lens.  I used polka dot for the icon cut, a double sided hot pink cardstock for the larger folded petals, bright pink and white for the middle size petal layer, and yellow for the tiny flower centers.  I finished the flowers with two tiny button centers - just like the original Cricut flowers.  These flowers are SOOO easy to make and look so cute.


I attached one of the flowers to the closure on the purse and used pop dots to "hang" the sunglasses on to the edge of the purse.  I also used pop dots to attach the second flower to the lower left corner of the purse.


To embellish the front of the purse I cut two strips of coordinating paper - the same tiny gingham that was used on the upper trim, and the reverse side - an Argyll print.  I glued the two strips to the lower front of the purse and then added the flower.  Finally, as I was putting away the Making Memories paper set that was used to make this project, I found this fun LAUGH cardstock sticker and I knew it would be the perfect finishing touch!! 


Thanks for popping by today.  Please do go over to BBTB2 and check out everyone's projects.  SOOO cute this week!!!  

Monday, April 18, 2011

Aloha Monday with BBTB2


It's an Aloha Monday with BBTB2!  My very talented design team sister, Karen, selected this week's Bitten by the Bug 2 cut - the pineapple on Wall Decor.  Since I do not own Wall Decor I had to select another pineapple from a different cartridge.  You would be surprised how many pineapples there are on various Cricut cartridges!  I selected this fun pineapple from Serenade!


Because I associate pineapples with "welcome" I decided to make a "Welcome to the neighborhood" card (hoping the house two doors down may sell soon).  I designed the card in Cricut Design Studio utilizing all three layers of the pineapple cut.  The bottom layer is a bright, fun yellow, the middle layer is a medium green, and the top layers are orange and lime green.  

I used the diamond embossing folder on the orange layer (top layer) of the pineapple.  I also used a rust colored Copic marker and did a bit of random coloring on the pineapple.  I added thin lines and amber colored gemstones.  I finished the card with the word "welcome" as well as icicle Stickles accents on the medium green areas.


The embellishment cuts are from Life's a Beach.  I thought my pineapple needed a bit of dressing up.  I layered two paper flowers together and added the lemon cut atop the flowers.  I added a fun circle sticker, mini flowers, and gems to dress up the lemon slice.


The base card was created by welding two mirror images of the base pineapples together at their tops.  I used scissors to snip away a couple of over hanging leaf tips.  Once the card was attached to the back of the pineapple, the card opens at the midpoint.


Today is your last chance to enter the awesome giveaway by The Original Scrapbox.  Go back to last Wednesday's post and read the instructions on entering.  I will be drawing a winner of this fabulous Giant Cutting Mat at midnight tonight.  And that's not all...... 

The winner from my blog will join nine other winners in a final drawing for this FABULOUS SEWING BOX!!!  Rachelle will be announcing the final winner on her blog on Friday!  Go back to THIS POST and enter.  The winner could be YOU!


Monday, March 28, 2011

Disney Blog Hop & Blog Candy


Hey there scrappers. Guess what? It is a Bitten by the Bug 2 blog hopping, blog candy, Disney Monday! If you are following the BBTB2 blog hop you arrived here from the beautiful Krista’s blog. If you are just stopping by my blog, don’t worry, the links for the blog hop are at the bottom of the post.


My design team sister Maria chose the challenge cut at BBTB2 this week and in honor of Spring Break she selected not a specific cut, but a theme – Disney, and more specifically, modern Disney. In keeping with her parameters, I chose Toy Story’s Buzz Lightyear.


My two year old nephew, Carter, is a quite the fan of Toy Story. For Christmas Carter received both Buzz Lightyear and Woody. His impish little grin was beaming!
I am going to say that Buzz is quite the assembly puzzle – so many little pieces in the Buzz images! It is helpful to have a photo of Buzz for reference during assembly. I cut Buzz at 5.5 inches and used the traditional grey, lime, purple, black and white colors for the pieces.


I used metallic cardstock to cut the Buzz Lightyear title. I cut the title a bit on the small side, but I wanted for Buzz, the title and the photo of Carter to fit inside the frame.

The trapezoid shaped frame is also in the Toy Story cartridge. I loved the fun shape of the frame as well as the planets, ships, nebulas, etc. cut outs. I did spend a great deal of time working on the frame. I decided that I wanted for my planets, ships, etc. to be multi colored. Sadly there are not individual cuts files for the frame parts. I hand cut metallic cardstock and glued it to the back of the top layer of the trapezoid frame. It was a lengthy process but well worth the effort.

I finished the layout with white doodles and a red trapezoid frame and photo of Carter. 


I did mention blog candy didn’t I? I have WONDERFUL blog candy – a $20 gift voucher sponsored by Custom Crops, your on-line Cricut and paper crafting super store! In fact, the Toy Story cartridge is currently in-stock, ON SALE, and ready to ship out to you so that you too can create this fun Buzz Lightyear layout. Be sure to stop by Custom Crops and check out all of the new products.
To be eligible for the gift voucher, leave a comment below.

If you have been following the blog hop, I am the last stop. If you came in mid way, you can go back to the beginning of the blog hop by going to Maria‘s blog. Or you can go by BBTB2 and check out the design team projects all at once. And remember, we would love it if you played along and post your Disney themed project in the linky at BBTB2.

Monday, March 21, 2011

Rainy Day Friends with Paisley and Hello Kitty


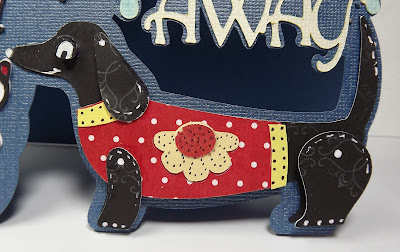
Happy Monday!  It is a fun Bitten by the Bug 2 Monday where the featured cut of the week is this fun little wiener (Dachshund) dog from the Paisley cartridge.   Our sweet design team sister, Melissa, chose this cut and I am soooo pleased that she did.  What a great cut! 


I combined my wiener dog with a kitty, Hello Kitty actually, so that it could be “raining cats and dogs”.   I remembered this great April showers Hello Kitty and decided that Kitty would want to share her umbrella with this sweet pup.


The phrase Rain, Rain Go Away is from the Nursery Rhymes cartridge.  The NR cartridge is a truly sweet cartridge and one that I do not use nearly enough.  I used a Copic marker and colored in the raindrops on the words.


I used the shadow cuts on the Dachshund, Hello Kitty, and the Rain phrase, welded together, as the front of the card.  I welded the shadow cuts to a rounded corner rectangle from George and Basic shapes to create the card.   To add a bit of dimension I used pop dots on the dog parts.


If you have not already done so, please do go by the Bitten by the Bug 2 blog and check out the design team projects.  I was completely WOW’ed by some of the DT projects!!!

Monday, March 14, 2011

Hey There Chickies


Happy BBTB2 Monday.   The challenge cut at Bitten by the Bug 2 this week is the Chick from the Easter 2010 cartridge.  I really love this cartridge!  The cuts are traditional Easter images - bunnies, chicks, eggs, bows. lambs, basket, etc.  If you do not own this cartridge, I highly suggest you try to find it.


Cut the challenge chickie in three different sizes and three colors/prints and created a welded shadow using Design Studio.  Using in pop dots I layered the chickies on the front of a circular card.   

The card itself was created using George and Basic Shapes and Easter 2010 cartridges.  The base card is two welded circles.  The circle is topped with the white textured cardstock doily cut from Easter 2010 and two Easter print circles from George. 


I cut the base card with pink orange peel textured cardstock.  For the time being the I left the inside of the card empty.


I finished the front of the card with flowers, orange Stickles, gemstones, and a script Happy Easter stamp.


Be sure to go to the BBTB2 site and check out all of the design team projects!