Showing posts with label Christmas Home Decor. Show all posts
Monday, December 20, 2010
Festive Holiday Lighting for BBTB2
Merry Monday scrappers! It is our last week of Bitten By The Bug 2 for 2010. We are going to have a nice break for the holidays but before we bid adieu to 2010 our sweet design team sister Julie has selected a final festive holiday challenge - the Gingerbread Man from Just Because Cards.
I decided to use the Gingerbread people to dress up my dining room light fixture. First I added faux greenery to the fixture. Next I made a four to five foot long paper chain (while watching a movie) and added that to the greenery. I purchased traditional looking Christmas balls and using wire ribbon I affixed the ornaments to the light fixture. And finally I added the Gingerbread people.
Using Design Studio, I cut six Gingerbread People, three men and three Gingerbread Women. I used Everyday Paper Dolls to create hair for each Gingerbread person as well as aprons for the women. I used Peachy Keen face stamps to add faces, black eyes and red mouths. And though you cannot see it in the photographs, I embossed the hair so that it looked more like frosting. I added red Stickles over the mouth stamps and a bit of white doodling to the aprons and buttons.
This may be the last of the BBTB2 pre-holiday projects, but it is not the last of the Busy with the Cricky pre-holiday posts. I will be back with a couple of more holiday projects to share! Be sure to drop by Bitten by the Bug 2 and check out the other Gingerbread projects!
Friday, December 10, 2010
Michael's Holiday Craft Contest - Week Five
I am sorry that I have been missing this week. I didn't feel well early in the week due to three nights in a row of "party food/rich restaurant food". After recovering from my tummy woes, I had yet another evening out with hubby and his business associate and I had to go into my office for a day. But... In the midst of my busy week, I have been working a couple of projects. The larger of the projects is this wall collage in my entry way for this week's Holiday Crafting Contest at Michaels.
For those who haven't been keeping up, this is week five of a seven week contest sponsored by Michaels on Facebook - Michael's Craft Some Holiday Magic Contest. I have entered four of the five weeks and actually won week two. Each of the seven weekly finalist will be in a final run off to win a Cruise. I may be calling on all of you in a couple of weeks for help and support me in my attempts to win the cruise!
Each Monday morning Michael's releases three new mystery items that must be used in that week's project. This week the three mystery items are WIRE, PHOTO FRAME(S), and WRAPPING PAPER.
I took ten photo frames and framed seven family Christmas photos from throughout the years. The oldest photo is my husband and his little brother with Santa in 1966; the newest is from last Christmas. Two of the photos are family Christmas photos and two of them are my children with Santa - 18 years ago and 7 years ago (when the older two were in high school). I used wrapping paper as matting behind the older photo of my children with Santa, and trimmed it out with peel offs (see above).
For the remaining three frames, I used wrapping paper, cardstock stickers or Cricut cuts to create Christmas scenes to add a whimsical touch to the collage (again see above).
I embellished nine of the frames with artificial greenery, curled wire, mini-ornaments, and HO-HO-HO red ribbon. The embellishments not only added to the overall holiday feel of the project, but they also gave me a way to incorporate the final mystery element - wire.
The final addition to the entry way wall was three vinyl words cut with the Cricut, JOY, CHRISTMAS, and PEACE. While I truly do not expect to win the contest this week (there are some cut projects posted), I was happy that both my husband and my daughter really liked our holiday collage.
Wednesday, December 8, 2010
Playing with New Nestabilities - Heirloom Ornaments
Tuesday was a cold day here in SC. Cold as in TRULY cold for us. It was in the 30s. Now before all of you readers located in Wisconsin and Michigan and other such chilly states fall over laughing, let me assure you that our windy 30s in the Carolinas IS cold! I even put on a jacket to walk to my mailbox and I don't really like wearing a jackets! The good news is I spent a big part of the afternoon in my scrap room playing with new toys. Not new in the sense that I just got them, but new in the sense that I just opened them.
I ordered and received Spellbinder's Heirloom Ornaments nesties in Oct/Nov and had not made time to get to know them. Today I opened the nesties and pulled out my Grand Caliber and had fun getting to know the set. I didn't create anything amazingly wonderful, but I did learn to cut two ornaments at once to create a frame shape.
In the end I cut three frames in green metallic cardstock, three large red cardstock ornaments, and three little Christmas trees from a Spellbinder's Christmas set. I assembled the three layers, then scored down the middle of each of the three ornaments. I applied glue to the back of each of the three ornaments and attached them all together. This would probably have looked better had I cut four of everything - that will teach me not to use scraps the next time I am playing!
I used a 1/8 inch hole punch and attached green cording to the ornament in order to hang it on our tree.
I will be back tomorrow with a super quick Christmas card to share.
Monday, December 6, 2010
Ho Ho Home Baked Goody Container
Good Bitten by the Bug 2 Monday! BBTB2's challenge cut of the week was selected by my design team sister Joanna and is the Santa from the Winter Frolic cartridge. As I am currently planning my baked good gifts for my neighbors, I am also planning packaging for the baked goods. I am planning to use large crafting paint cans as their size will allow for greater volume.
The Santa was cut using design studio at 2.5 inches so he would fit nicely on this lacy nestability. I cut the base Santa in black and the remaining cuts in either red or white cardstock. I assembled the Santa with glue, using a Copic skin tone marker on Santa's face and cheeks. I added a gemstone as Santa's cherry nose. The toy bag and belt buckle were cut in black glittery cardstock.
I cut all five of the lacy edged nesties in pink cardstock. Santa was attached to the second to the largest nestie.
The paint can was covered in a blue on blue pattern cardstock purchased from Darcie's. Using white cardstock scraps and a Spellbinder's large border, I cut the bottom edge border using my Spellbinder's Grand Caliber machine. The border was then glued to the can.
I found a 1.5 inch diameter snowflake stamp in my stash and decided to add stamped snowflakes to the printed paper. Snowflakes were also added to some of the pink nestie cuts.
Using a piercing tool and hammer, I pierced the can and attached the large jeweled snowflake brads. The pink nesties were also added around the can.
The top of the can was trimmed in blue, white and silver ribbon, then trimmed out in silver peel offs. Silver peel offs were also attached to the bottom edge of the can.
Additional ribbons were tied to the handle and for the photograph only I added holographic shred to the can. In real life the can will be lined with Christmas print food wrap and will contain home baked goodies for my neighbors!
Friday, December 3, 2010
Polar Bear Express Wreath - Michaels Weekly Contest
It seems like forever since I have been in my scrap room to do more than grab supplies and go work on a non-paper crafting project. Today was no exception. But before I go into that, let me tell you about yesterday.
MFK (my friend Kathy) and I made a trip to Michaels! For us Michaels is a 40-45 minute car ride so it is not like running out to Hobby Lobby. My $100 gift card from week two of Michaels Crafting Holiday Magic contest arrived and we went in search of good deals. Armed with coupons (thanks MFK) and gift card we stormed Michaels. I was disappointed that they were sold out of the Snow Angel Imagine cartridge, but I did not let that drag me down. I purchased some sale paper, some cardstock, a couple of sets of stamps, a large paper punch, etc, etc. Honestly I do not recall all that came home with me. I also purchased holiday supplies - the supplies for my Polar Bear wreath, gift wrap, and lots of ribbon.
MFK and I then went to a HUGE Christmas store and wandered for another hour!! I found some great buys - including a LOUD set of toys for my nephew for Christmas. My mom assures me that Carter will LOVE the guitar. She was amused that I wanted loud toys. Yes, I am getting even with my brother for winding my kids up when they were little!
So that was my day and that is why there were no new crafts to share. But today I have crafts. Not paper crafts, but crafts non-the-less.
Today I created my Polar Bear Express wreath. The required materials were a wreath, plastic ornaments, and yarn. The materials used were: Celebrate It Christmas 24” Wreath, 5 Jingle ‘n’ Jolly Polar Bear Ornaments - with yarn knitted scarves, 5 Celebrate It plastic ornaments, 24 gauge wire, Icicle Stickles, Candy Cane Red Stickles, 3/8 inch red ribbon, Celebrate It 1.5 inch white-dot on white ribbon, wire cutters, and needle nose pliers.
Begin by cutting five 10-inch lengths of wire. Wrap the wire around the neck of the polar bears, placing the wire under the yarn knit scarves. Using the needle nose pliers and affix the bears to the wreath. Remove the tops from the plastic ornaments. Squeeze two continuous swirling lines of Stickles onto the ornaments – one in Icicle Stickles and one in Candy Cane Red Stickles. Set the ornaments upside-down and let them dry. When the Stickles have dried, replace the tops onto the ornaments and tie a 4 inch strip of ribbon on to each ornament. Use 5 inch lengths of the wire and affix the ornaments to the wreath. Make five large double loops of ribbon and wire them to the wreath. Finally make a large bow and wire it to the wreath. Hang and enjoy!
I will be doing some paper crafting this weekend. I have to create my BBTB2 project for Monday, as well as use some of my new toys!!!
Wednesday, December 1, 2010
Working on the Christmas Bomb Explosion
The annual Christmas bomb exploded at our house earlier this week. The Christmas bomb debris is scatter through the entryway, down into the great room, across into the dining room, and back into the study. I have been working to make the house a winter wonderland and that is why I have a lack of paper crafting to share.
I am going to share a bit about our large family tree. I love our tree. It features heirloom ornaments, handmade treasures my children made when they were small, Wedgwood ornaments, photo ornaments, etc. I love the eclectic mix. Sitting here with my laptop when I glace up I see glitter ornaments I made last year with the scrappy girlfriends, Ian as a doily angel, and a hand blown snowman. Looking up I see a Wedgwood angel, a china nativity, and the Beatles yellow submarine! I am currently deciding if I should finish the tree with ribbon or with beads wrapping around.... oh decisions, decisions.....
This tree has baby photo charm ornaments, gingerbread people made in scouts, Snoopy, and tons of angels. I feel that in some ways the tree highlights different phases of our lives and is truly representative of our family.
Perhaps that is why it is taking me days to finish the decorating - I have memories associated with so many of our decorations and I enjoy remembering as I touch each item. I smile when I see the "Our First Christmas" ornament date 1981, given to me by my former sister-in-law (who I still love). I lovingly touched the little stuffed reindeer my father-in-law gave to Aaron his first Christmas (my father-in-law's last Christmas), and I smile when I put the Carolina Panther and Michigan State University ornaments out.
One last place to share - the fire place. I have not finished the top shelf yet, but this area is coming along nicely. The ceiling in this room is 16 feet tall, so in addition to the Christmas containers, there is also a ladder still in the room! I sure hope no one drops by unexpectedly!!!
This may be a season of advent - preparing for the celebration of the birth of the Christ child, but it is also a season for fond memories and for making new memories. I promise to finish with the Christmas bomb soon and return to my scraproom!
Thursday, November 11, 2010
Advent Calendar for Graphic45's Calendar Challenge
One of the blogs that I like to frequent is the Graphic 45 paper blog. They have great hints, projects and tips for using their products, which I really love. They also feature different scraprooms, which is always a wonderful way to get new organizational idea. I know that some people think the Graphic 45 lines are too busy or too retro, but that is exactly what I love about them. That, and they seem soooo feminine. Anyway, Graphic 45 is currently hosting a calendar contest. At least 50% of the project must be completed using Graphic45 paper products. Since I had already completed a huge calendar project, I decided to make an Advent Calendar.
It is a little ironic that when my children were small we always had an advent wreath with weekly candles and now that they are grown we finally get the treat count down calendar! I began by purchasing this Kaiser Craft wood and heavy duty chip board kit. The frame of the advent calendar is made of wood, with a peg and groove construction (though you will need to do a bit of filing/sanding). The drawers are made of heavy duty chip board and also require assembly. The kit also contains chip board numbers for the drawer fronts.
I began by assembling and painting the wooden frame section. I chose a glossy white paint, for a nice neutral background. The wood required two coats of paint on all of the exposed areas. As a hint, if I were to do this again, I would paint first, then assemble.
The second step in assembly was attaching Graphic 45 Christmas Past cardstock to the out outside edges of the frame. After measuring and cutting the paper I used strong liquid glue to affix the paper to the frame.
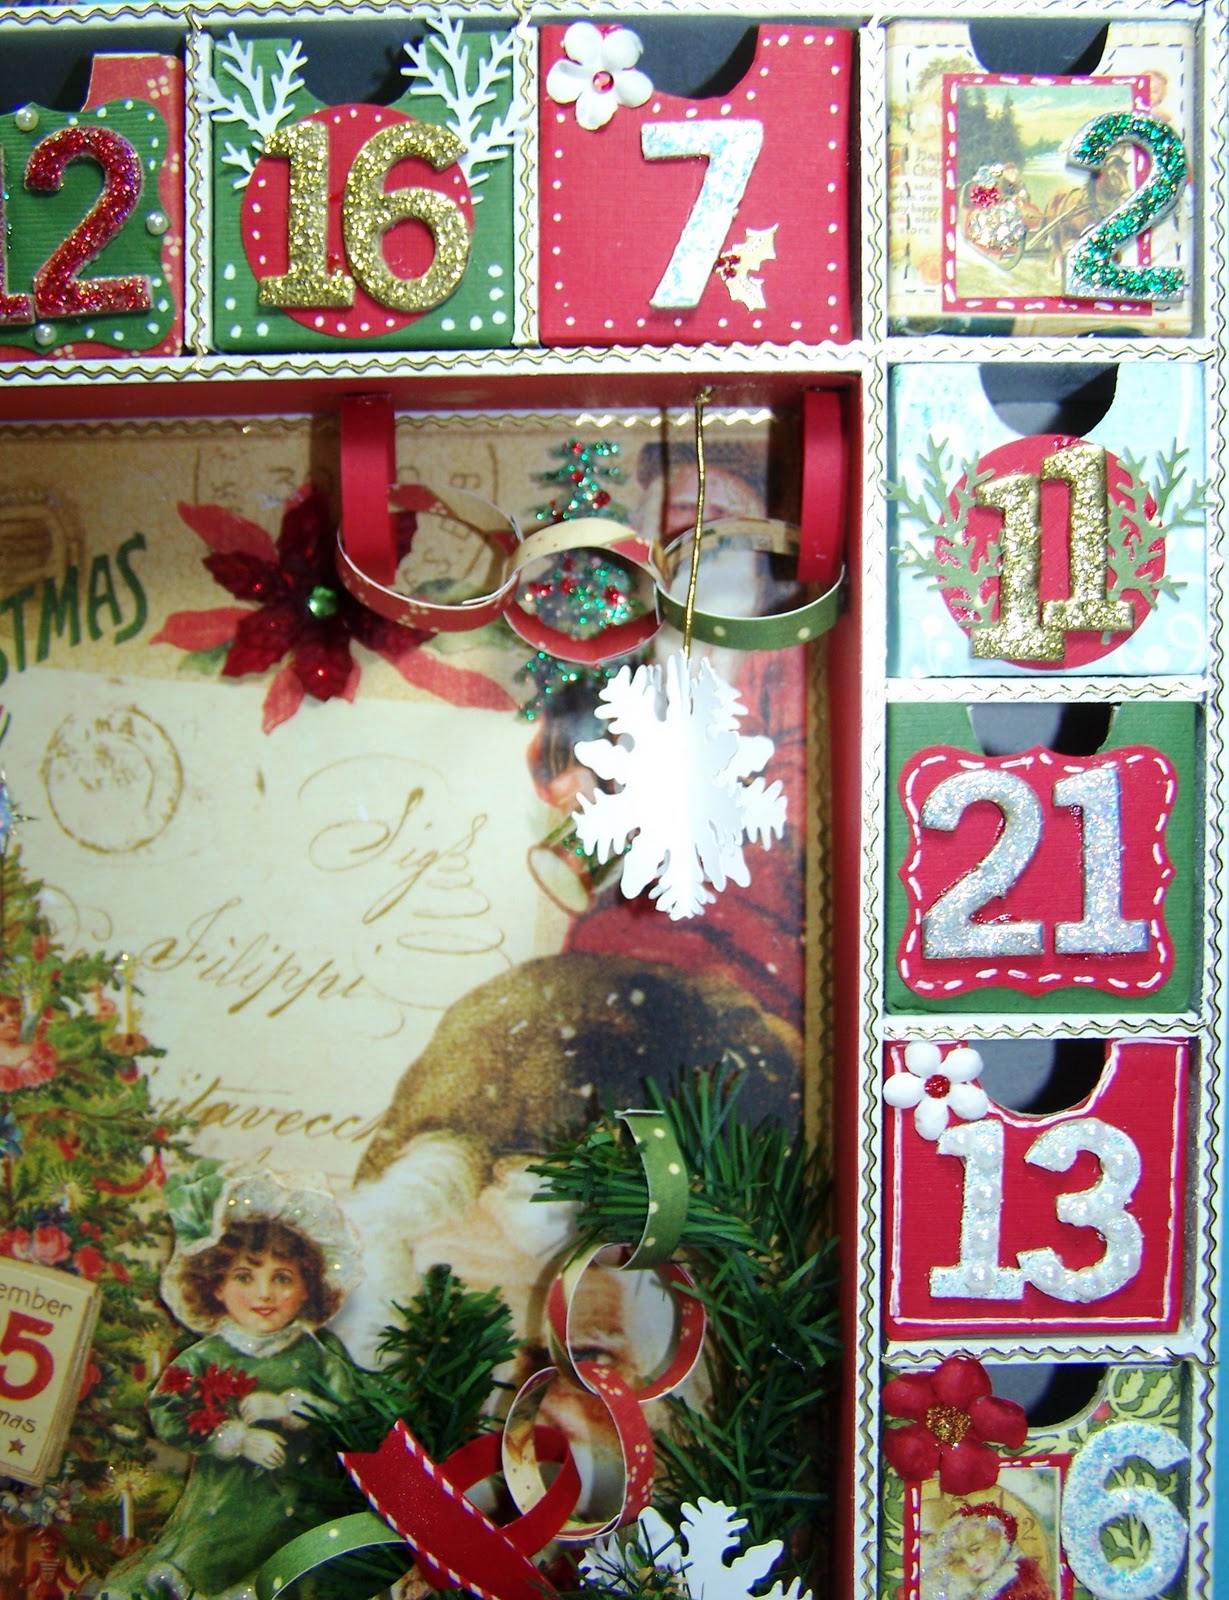
Above is a photo of my desk as I was working on the project. At one point I lost the number 21. I had to wait until the end and clean up my desk before the number was ever found.
After preparing the frame, I moved on to the numbers. I heat embossed all of the numbers, rotating embossing colors as I worked my way through the numbers. Once the numbers were completed, I moved on to the drawers. The drawers took a really long time to assemble! Just sayin'....
Utilizing the 12 inch trimmer and a scoring board really helped speed up the drawer assembly process. I began by measuring the drawers and cutting strips of Graphic 45 and Bazzill cardstock - 24 strips! I scored all of the strips 1/4 inch from the bottom edge and then I traced the half circle shape (finger hole) onto all of the strips. I cut out all of the half circles. Finally, I lined up the half circles and glued the paper onto the chip board drawers. The heavy duty glue and cardstock wrappers hold the drawers together. Fold under and glue the 1/4 inch border to the bottom of the drawers.
Remember I said that I rotated the color of the numbers while embossing? As I covered the drawers I made some decisions about color choices. I decided that all of the white embossed letters should go on red drawers. I also decided to use some of the postage stamp images from the Graphic 45 cardstock to embellish the drawer fronts. For the double digit numbers where there was not enough space for an image, I used paper punches and punched circle and tag shapes on which to mat the numbers. I finished the drawers by adding black and white pen doodles, pearls, gems and flower embellishments.
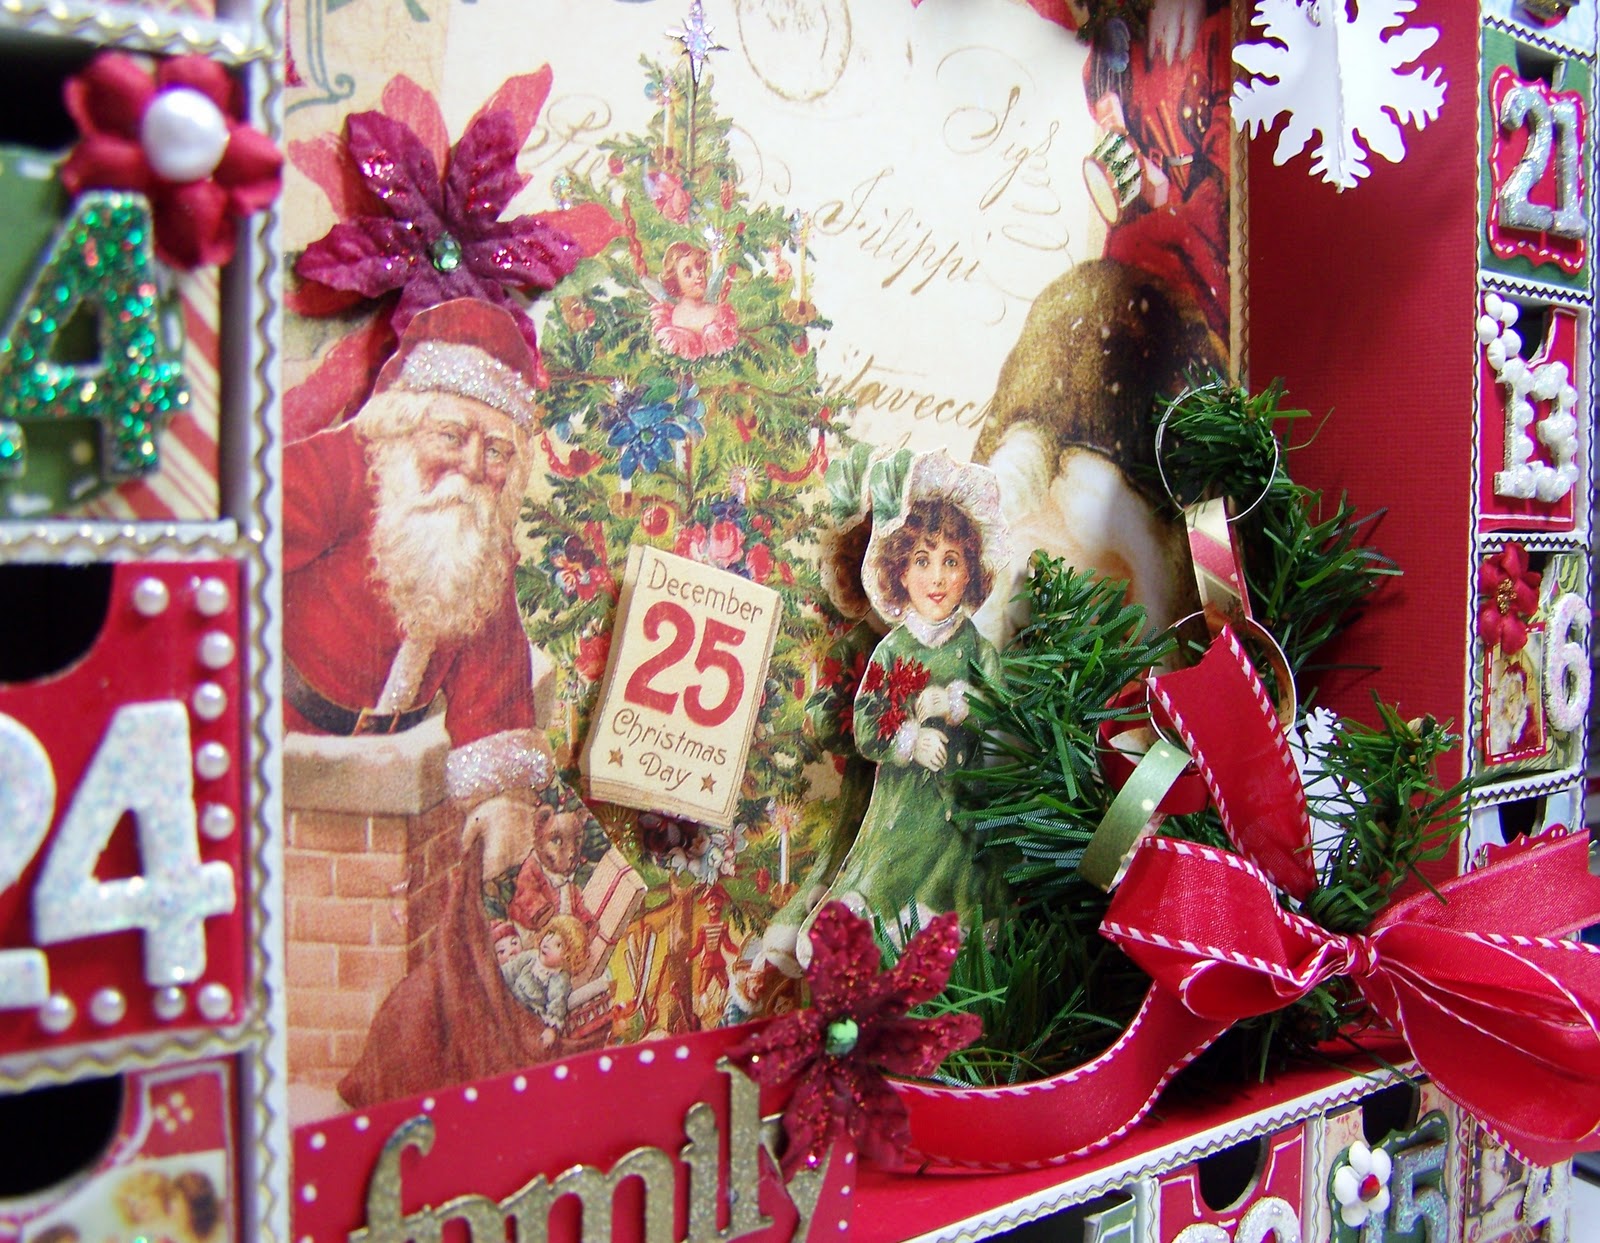
After the drawers were complete and I had added the center image to the box I began working on embellishing the center image. I started by trimming out the image with red cardstock. Next I cut the Santa, the calendar page, and the little girl from a second sheet of the same cardstock and using pop dots to create layers I created a 3-D effect on the scene. The calendar page has single thickness pop dots, the girl has two layers of pop dots, and the Santa has three layers of pop dots. Stickles were added to the fur on Santa and the girl as well as to the candles in the background trees.
I added some artificial greenery; ribbon, old fashioned paper chains (made of 1/4 strips of Graphic 45 and Bazzill cardstocks), and 2-D and 3-D snow flakes to complete the vintage feel of the scene. I also added greenery, ribbon and a snowflake to the upper left section of the frame.
The snowflakes were cut with the Cricut expression using the 2009 Seasonal cartridge, When It's Cold Outside. The flakes were cut at 1.5 inches each.
One last embellishment was added to the lower left corner of the frame inside. I added the word "family" to a rectangle of red cardstock, as well as dots and a flower. Why family? Because family is the most important thing to me.
Above is a close up of the inside of the box.
And below is a semi-side view showing the frame as well as the completed advent calendar.
Subscribe to:
Posts (Atom)